> ## Documentation Index
> Fetch the complete documentation index at: https://docs.modaal.dev/llms.txt
> Use this file to discover all available pages before exploring further.
# Connect your agent
> Modaal orchestrates a coding agent that writes your Swift code. Start instantly with the built-in free preview, then connect your own agent — Claude, Codex, Gemini, Copilot, Cursor and more — using a subscription you already pay for.
Modaal is the **orchestrator**; the **agent** is the model that actually writes your code. Every new project starts on Modaal's built-in **free preview** agent so you can try things immediately. When you're ready, connect your own agent — it's almost always **cheaper than paying per-API-call**, and you can **switch any time**.
## Why connect your own agent?
Already subscribed to Claude, ChatGPT/Codex, Gemini, or Copilot? Sign in and Modaal runs on that plan — no separate API bill.
The free preview is for trying Modaal out. Your own agent gives you the full, latest model and higher limits.
Connect several agents and flip the default whenever you like. Your project doesn't change — only who writes the code.
***
## Open Agent settings
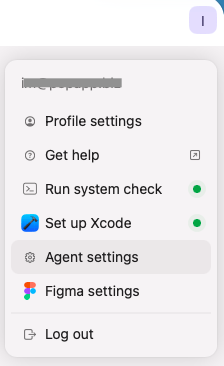
Click your **profile avatar** in the top-right corner to open the **User Menu**, then choose **Agent settings**.
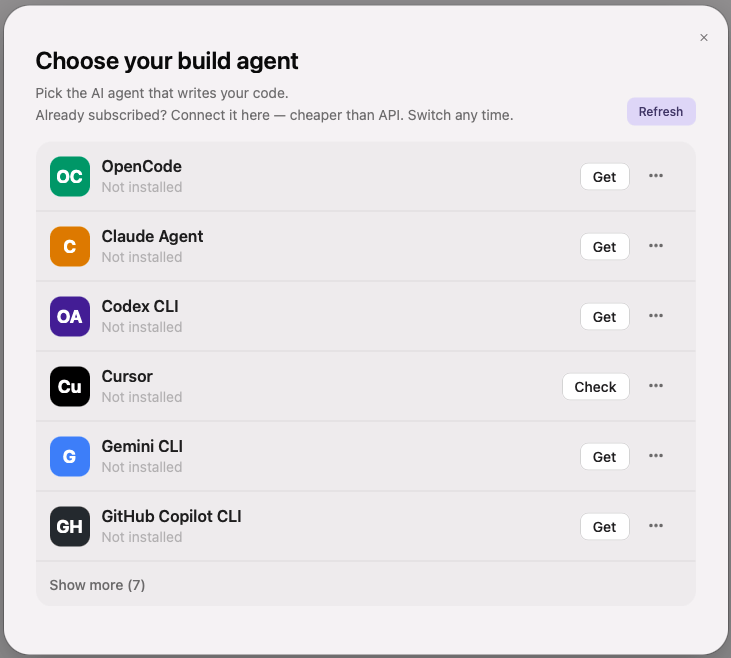
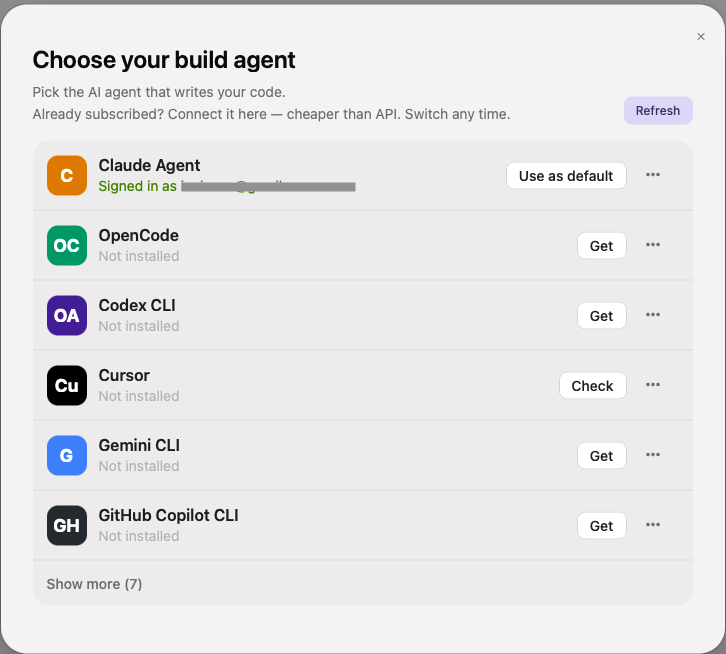
 This opens **Choose your build agent** — the list of every agent Modaal can drive. Each row shows the agent, its current status, and one action button. **Show more** reveals the full catalog.
 ***
## The two kinds of action button
Before you start, it helps to know that agents differ along two simple axes — and those two axes are all that change the buttons you see.
### 1. Getting the agent onto your Mac — **Get** vs **Check**
| Button | What it means | Examples |
| --------- | ----------------------------------------------------------------------------------------------------------------------------------------------------- | ---------------------------------------------------------------------------------- |
| **Get** | Modaal can **install** this agent's CLI for you (via `npm` or Homebrew). Just click it. | Claude Agent, Codex CLI, Gemini CLI, GitHub Copilot CLI, OpenCode, and most others |
| **Check** | Modaal **can't install** this one — you install its CLI yourself, then Modaal detects it. Click **Check** (or **Re-check**) once it's on your system. | Cursor, OpenHands, Mistral Vibe |
### 2. Signing in — **in-app login** vs **Login via Terminal**
After the agent is installed, you sign in with your own account:
* **In-app login** — Modaal signs you in directly. For some agents (like Claude) you'll pick *how* to sign in from a small menu; for others it starts straight away. These agents can also be **re-authenticated** later from the **⋯** menu.
* **Login via Terminal** — Modaal opens a Terminal window where the agent's own CLI handles sign-in. Once you've signed in there, come back and click **Re-check** so Modaal picks it up.
You don't need to memorize which agent is which — the panel always shows the right button for the right step. The rest of this guide walks the happy path with **Claude Agent**.
***
## Connect an agent, step by step
Find the agent you want and click **Get**. Modaal downloads and installs its CLI for you (this can take a minute). If the agent shows **Check** instead, install its CLI yourself first, then click **Check**.
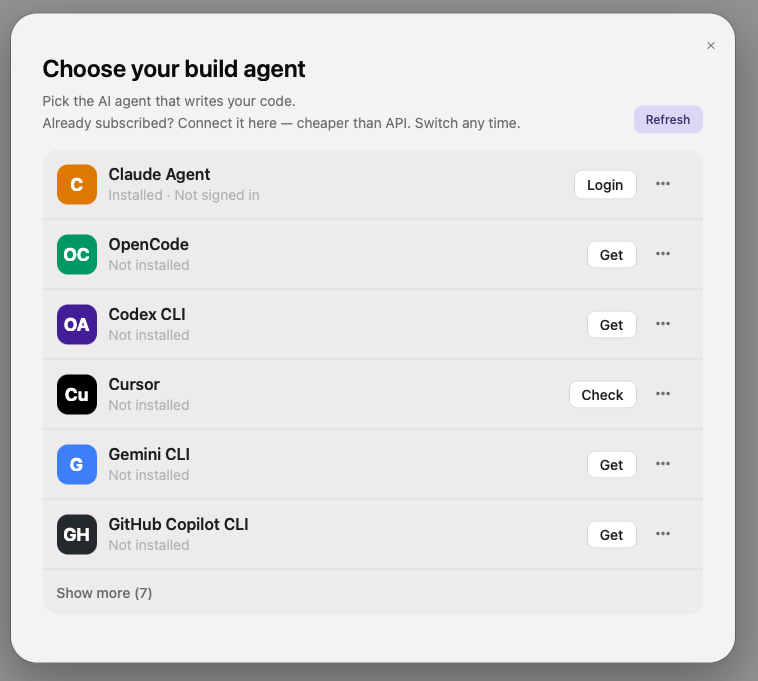
When it's installed, the status changes to **Installed · Not signed in** and the button becomes **Login**.
***
## The two kinds of action button
Before you start, it helps to know that agents differ along two simple axes — and those two axes are all that change the buttons you see.
### 1. Getting the agent onto your Mac — **Get** vs **Check**
| Button | What it means | Examples |
| --------- | ----------------------------------------------------------------------------------------------------------------------------------------------------- | ---------------------------------------------------------------------------------- |
| **Get** | Modaal can **install** this agent's CLI for you (via `npm` or Homebrew). Just click it. | Claude Agent, Codex CLI, Gemini CLI, GitHub Copilot CLI, OpenCode, and most others |
| **Check** | Modaal **can't install** this one — you install its CLI yourself, then Modaal detects it. Click **Check** (or **Re-check**) once it's on your system. | Cursor, OpenHands, Mistral Vibe |
### 2. Signing in — **in-app login** vs **Login via Terminal**
After the agent is installed, you sign in with your own account:
* **In-app login** — Modaal signs you in directly. For some agents (like Claude) you'll pick *how* to sign in from a small menu; for others it starts straight away. These agents can also be **re-authenticated** later from the **⋯** menu.
* **Login via Terminal** — Modaal opens a Terminal window where the agent's own CLI handles sign-in. Once you've signed in there, come back and click **Re-check** so Modaal picks it up.
You don't need to memorize which agent is which — the panel always shows the right button for the right step. The rest of this guide walks the happy path with **Claude Agent**.
***
## Connect an agent, step by step
Find the agent you want and click **Get**. Modaal downloads and installs its CLI for you (this can take a minute). If the agent shows **Check** instead, install its CLI yourself first, then click **Check**.
When it's installed, the status changes to **Installed · Not signed in** and the button becomes **Login**.
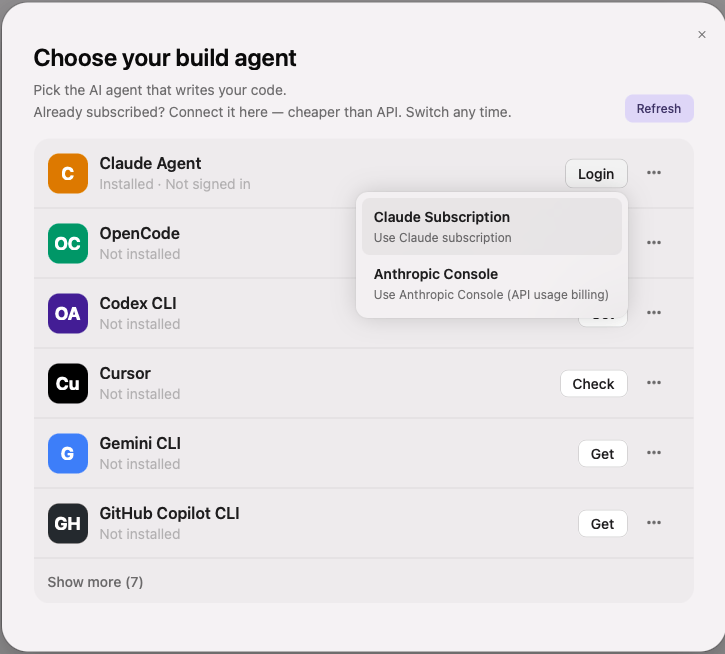
 Click **Login**. If the agent offers more than one way to sign in, pick the one that matches your plan. For **Claude Agent** you choose between:
* **Claude Subscription** — use your Claude (Pro/Max) subscription.
* **Anthropic Console** — use Anthropic Console (API usage billing).
Pick **Claude Subscription** to use the plan you already pay for. A browser window opens for you to sign in and approve access.
Click **Login**. If the agent offers more than one way to sign in, pick the one that matches your plan. For **Claude Agent** you choose between:
* **Claude Subscription** — use your Claude (Pro/Max) subscription.
* **Anthropic Console** — use Anthropic Console (API usage billing).
Pick **Claude Subscription** to use the plan you already pay for. A browser window opens for you to sign in and approve access.
 Agents that use **Login via Terminal** instead open a Terminal window — sign in there, then return to Modaal and click **Re-check**.
Once you're signed in, the status shows **Signed in as \** and the button becomes **Use as default**. Click it to tell Modaal to write your code with this agent.
Agents that use **Login via Terminal** instead open a Terminal window — sign in there, then return to Modaal and click **Re-check**.
Once you're signed in, the status shows **Signed in as \** and the button becomes **Use as default**. Click it to tell Modaal to write your code with this agent.
 The button turns into a **✓ Default** marker. That's it — your next message in Modaal is handled by your own agent.
***
## Switching agents later
You can connect as many agents as you like and switch the default whenever you want — open **Agent settings** again and click **Use as default** on a different one. Useful tools live in each row's **⋯** menu:
* **Re-check** — re-detect status (use this after signing in via Terminal, or installing a **Check** agent).
* **Re-authenticate** — sign in again (in-app login agents).
* **Log out** — sign out (only some agents support this in-app; otherwise sign out from the agent's own CLI).
* **Show details** — expand the row for version and account info.
***
## Troubleshooting
This almost always means your sign-in token has gone stale — a **transient** issue, not a broken account. The fix is to refresh your credentials:
1. Open **Agent settings** (User Menu → **Agent settings**).
2. On your agent's row, open the **⋯** menu and click **Re-authenticate** if it's there, then sign in again.
3. If there's no **Re-authenticate** option, click **Log out** and then **Login** again. For agents that sign in through Terminal, sign out and back in via the agent's own CLI, then click **Re-check**.
Once you've signed back in, retry your request. Other transient auth errors (403, “token expired”, “unauthorized”) clear the same way.
Click **Re-check** on the agent's row — sign-ins done in a Terminal window are only picked up on re-check. If it still won't catch, **Log out** / **Login** again from Agent settings.
Click **Show more** to reveal the full catalog. If it's a **Check**-type agent (e.g. Cursor), install its CLI yourself first, then click **Check** so Modaal can detect it.
Connecting your own agent is the single biggest upgrade over the free preview — you get the full model on a plan you already own. If you're not subscribed to any, **Claude**, **ChatGPT/Codex**, **Gemini**, and **GitHub Copilot** all have plans that work well with Modaal.
**Need help?** Join our [community on Discord](https://discord.gg/KyQzDXxgU3).
The button turns into a **✓ Default** marker. That's it — your next message in Modaal is handled by your own agent.
***
## Switching agents later
You can connect as many agents as you like and switch the default whenever you want — open **Agent settings** again and click **Use as default** on a different one. Useful tools live in each row's **⋯** menu:
* **Re-check** — re-detect status (use this after signing in via Terminal, or installing a **Check** agent).
* **Re-authenticate** — sign in again (in-app login agents).
* **Log out** — sign out (only some agents support this in-app; otherwise sign out from the agent's own CLI).
* **Show details** — expand the row for version and account info.
***
## Troubleshooting
This almost always means your sign-in token has gone stale — a **transient** issue, not a broken account. The fix is to refresh your credentials:
1. Open **Agent settings** (User Menu → **Agent settings**).
2. On your agent's row, open the **⋯** menu and click **Re-authenticate** if it's there, then sign in again.
3. If there's no **Re-authenticate** option, click **Log out** and then **Login** again. For agents that sign in through Terminal, sign out and back in via the agent's own CLI, then click **Re-check**.
Once you've signed back in, retry your request. Other transient auth errors (403, “token expired”, “unauthorized”) clear the same way.
Click **Re-check** on the agent's row — sign-ins done in a Terminal window are only picked up on re-check. If it still won't catch, **Log out** / **Login** again from Agent settings.
Click **Show more** to reveal the full catalog. If it's a **Check**-type agent (e.g. Cursor), install its CLI yourself first, then click **Check** so Modaal can detect it.
Connecting your own agent is the single biggest upgrade over the free preview — you get the full model on a plan you already own. If you're not subscribed to any, **Claude**, **ChatGPT/Codex**, **Gemini**, and **GitHub Copilot** all have plans that work well with Modaal.
**Need help?** Join our [community on Discord](https://discord.gg/KyQzDXxgU3).